

How To Do Light Switch Installation

Intermediate switch lighting circuits. In this video we're going to be looking 4 different ways to control a light using 3 separate switches and and so besides two ways to command a lite using 4, or more switches. This is useful for instance to command the lights on stairs to different floors or perhaps from either side of the bed and at the bedroom door, like you might observe in a hotel.
Scroll to the bottom the watch the YouTube video tutorial on intermediate switches
In our last tutorial nosotros looked at how to control a lite with just two switches. Do cheque that out if you haven't already, click hither to come across.
Alert
Electricity is dangerous and tin can be fatal, y'all should be qualified and competent to carrying out any electrical work. Never work on live/hot electrical circuits.
This system is chosen by a unlike proper noun depending on where you live. In north America this is called a 4 way switched circuit and in the Eu and other parts of the globe this is chosen an intermediate switch excursion. We're going to focus on the Eu/U.k. method and colour coding.
To make this circuit piece of work we crave two different types of switches. A two way switch and an intermediate switch. Once again, the names of the type of switches depends where in the world you live.
The two way and intermediate switch will wait the same on the front. However, the two style has 3 terminals on the dorsum. The switch can exist flipped only two ways, up or down, but the electricity tin flow through the switch in 4 different ways, depending on how it's connected into the circuit.
The intermediate switch can also just be flipped two ways, up or downward, but on the back we notice four terminals. The electricity tin flow through this in xiv different ways, depending on how it's wired.
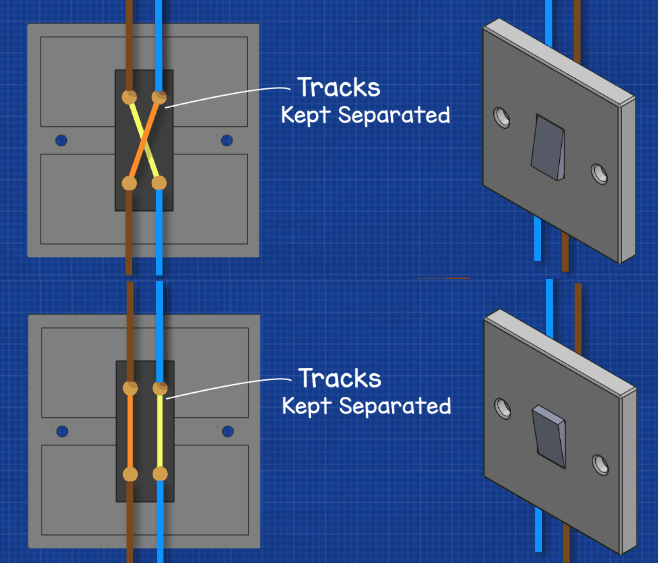
This switch has a mechanical component inside which ways that when the switch is flipped, it crosses its's artillery to change the direction. These ii arms DO Non TOUCH they are kept separated. By crossing it's arms to alter the direction we can therefore make or break a circuit.
The colour of the cables varies around the world. In this video I'm using the European colour code only you should check your local regulations.
Method 1 – New install
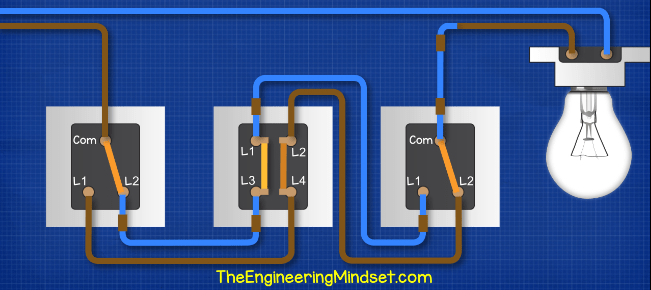
The showtime circuit nosotros will look at is the simplest method and the easiest to sympathize. It's typically used for a new installation.
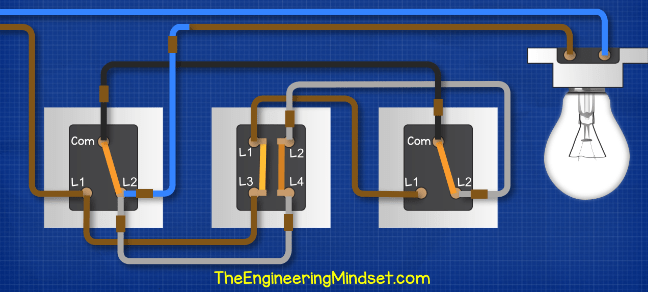
We have our two way switches at either end then an intermediate switch in the center. Nosotros take our live feed and connect it into the common of switch 1. We then run a brownish cable from L1 of switch ane over to L4 of switch 2. We then run a chocolate-brown cable from L2 of switch two, over to L2 of switch 3.
We then run a blue wire from L2 of switch one over to L3 of switch 2, we place a brown sleeve at each terminate of the wire to warn that information technology is intermittently live. We run another blueish wire from L1 of switch 2 over to L1 of switch 3. And and so we run a final blue wire from the common of switch 3 upward to the calorie-free.
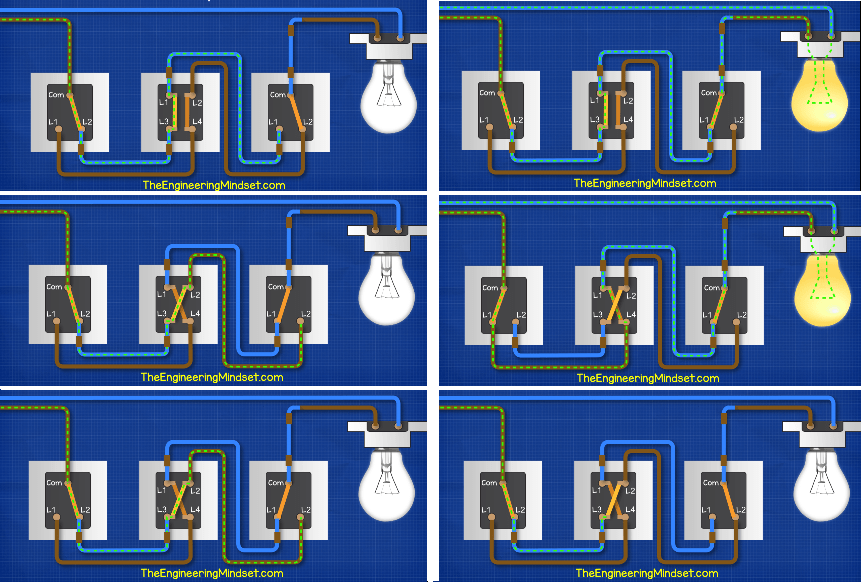
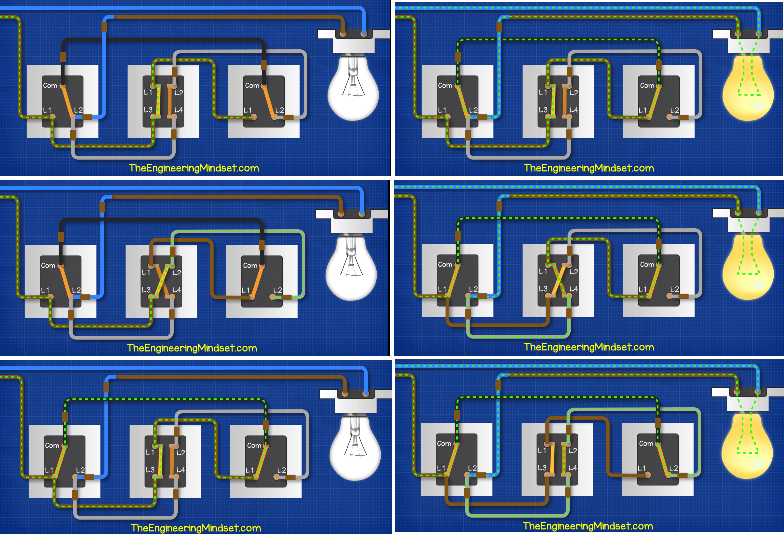
Now, when we turn the power on, the electricity can menses through switch i and two and into switch 3, but the excursion is broken then the calorie-free is off. If we so flip switch 3, we complete the circuit and the light turns on. If nosotros flip switch 2 we cross the paths and intermission the circuit. If we flip switch i nosotros make the circuit again. If we flip switch 1 again and so we brake the excursion. If we flip switch 3 so nosotros complete the excursion. And if we flip switch two then we interruption the circuit.
Method 2 (existing install)

This is the 2nd method which is typical for converting an existing circuit.
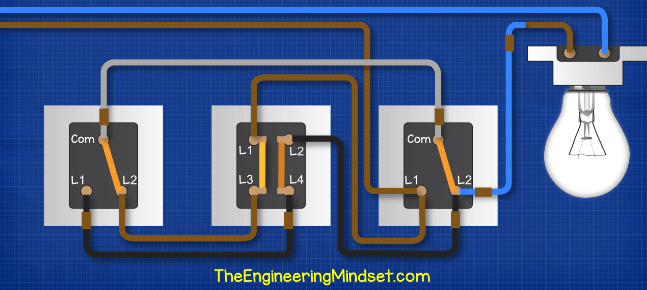
In this version we run the live to L1 of switch 1, then from, L1 of switch 1 to L1 of switch 2, and so from L3 of switch 2 to L1 of switch 3.
We then run a gray wire from L2 of switch 3 to L4 of switch two, placing a dark-brown sleeve on the wires to betoken that it is intermittently live. Nosotros so run some other gray wire from L2 of switch 2 to L2 of switch 1.
We then join the 2 end switches with a blackness wire to each common. And then connect the blue wire from L2 of switch 1 to the light circuit.
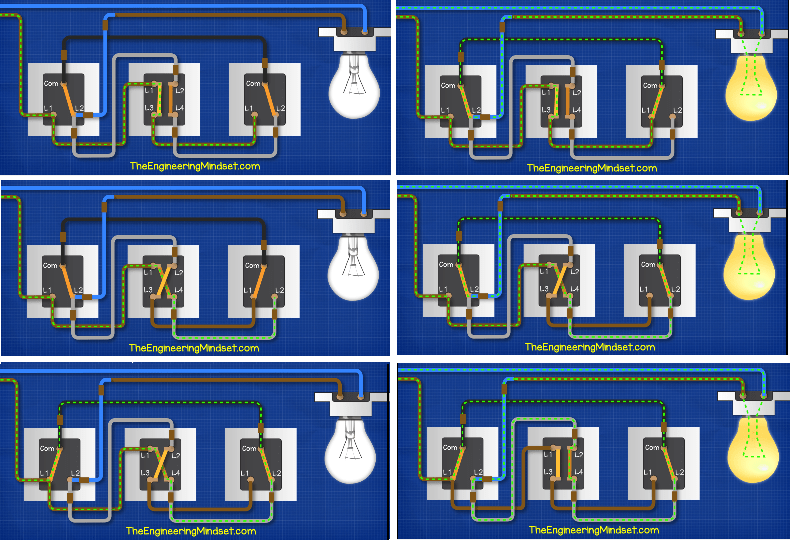
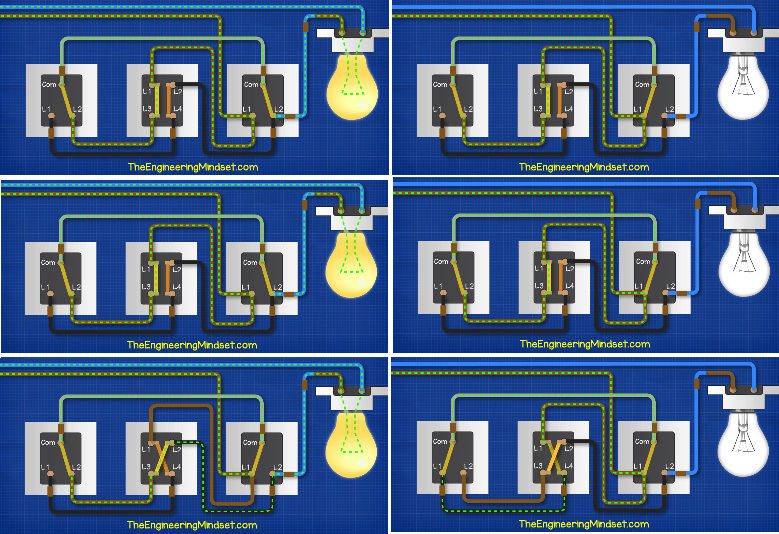
When nosotros turn the power on the electricity passes through switch ane and 2 and stops at switch 3 because the circuit is broken. If nosotros flip switch 3 we make the circuit and the lamp turns on. If nosotros flip switch 2 then we break the circuit and the lamp is off. If nosotros flip switch 3 we brand the circuit again. If we flip switch 1 then we break the circuit and then it can't achieve the lamp. We flip switch 2 to make the circuit and we interruption the circuit by flipping switch i.
Method 3 – variation of method 2 (Existing install)
This method is a variation of the last i where we use the same cables but change their route a little. We have the live into L1 of switch 1, then a brown wire from L1 of switch 1 to L3 of switch 2, then another brownish wire from L1 of switch 2 to L1 of switch 3.
Then nosotros have the grey wire from L2 of switch 1 to L4 of switch 2 and another from L2 of switch 2 to L2 of switch 2. Then a black wire between the two commons and finally the blue wire back to the lamp excursion.
When we power this excursion, the electricity flows through switch one and 2, but stops at switch 3. If we flip switch 3 we make the circuit and the calorie-free can turn on. If we flip switch ii we interruption the excursion. If we flip switch 1 we make the excursion. If we flip switch 2 we break the circuit. If we flip switch iii we brand the circuit and if we flip switch one nosotros pause the circuit.
Method 4 (Existing install)
In this blueprint we're bringing the ability and lamp control to the right most switch. We run a brownish wire from L1 of switch three to L1 of switch 2, then another brownish wire from L3 of switch 2 over to L2 of switch 1. Then nosotros run a grey wire from the common of switch 1 over to the common of switch 3. We then run a black wire from L2 of switch three to L2 of switch 2, so another black wire from L4 of switch 2 over to L1 of switch 1 and finally nosotros have the blue wire from L2 back to the lamp.
When nosotros power this circuit, the circuit is complete and so electricity flows through switch 3, two, 1 and back to iii where it and so feeds the light. If we so flip switch 3 we intermission the circuit. If we flip switch ii we make the circuit again. If we flip switch i we break the circuit. If we flip switch three we again make the circuit. If we flip switch two we interruption the circuit and if we flip switch one nosotros make the excursion.
Method 5 – Elementary 4, 5, 6 etc switching (New install)
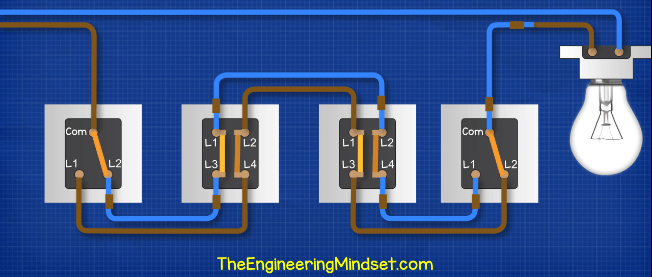
This method is the simplest way to connect 4, 5, six or more than switches into a calorie-free excursion. Information technology's based off the design in the very showtime method nosotros saw earlier in the video. This is typically used for completely new installations. The power comes in from one end and the lamp is connected to the other end. This style allows any switch to make or interruption the circuit.
Method – 4, 5, six etc switching conversion (existing install)
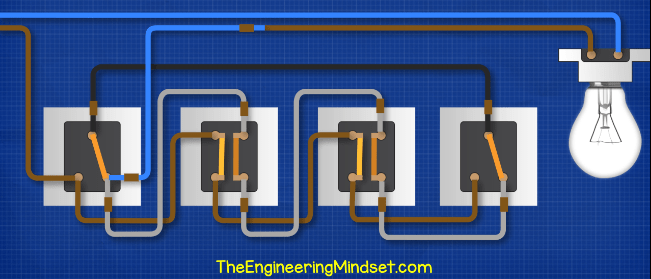
With this method we tin add iv, 5 ,half dozen or more than switches to an existing installation and nosotros base it on the 3rd method which we saw earlier in the video. For this we but extend the blackness wire from the two common terminals of the switches then nosotros run the grey and brown wires between the switches. This allows us to extend it equally much every bit we demand. Each switch can so make or intermission the circuit independently.

Source: https://theengineeringmindset.com/intermediate-switch-lighting-circuits-eu-uk/
Posted by: davidsonagainto.blogspot.com
0 Response to "How To Do Light Switch Installation"
Post a Comment